FMP 3: Final Piece

This is the end result of my third ‘Final Major Project’ and I have mixed feelings about it. I am very disappointed in myself that I did not get more of it finished, if not completed but considering the limitations, I am happy with what I achieved. It may be a case of trying to run before I can walk but taking into account the length of the song, the complexity of the storyboard, the inadequate puppets and the amount of time that I had to complete it all, on my own, as well as two other animation projects, I can look at what I have and be happy with it.

Whilst the project didn’t go particularly well, it has been very useful for me. It’s given me a chance to explore the medium in a way that I never had before but has also made me realise that I don’t need to aim big to be successful, at least for the moment; I believe my time would be better spent on developing my skills on smaller projects where I can experiment and learn. One of the main lessons I’ve learned is on character design and that I should consider functionality – how the puppet will move and interact with things, something that will become even more important if I continue to create inhuman creatures.

No matter what the outcome of this project, I know that I have learned from it. If nothing else, it has been legitimate practice and I feel that my animation skills have improved.

FMP 3: Editing

Screen Shot 2016-05-27 at 09.54.14

Above is a screenshot of the final animation after it has been edited and had some colour correction to brighten a few of the scenes.

This is my final animation before I added any of the effects. I was happy with the edit but upon review, certain scenes were far too dark and almost indiscernible. I also later added in the ‘Khaidian’ logo to tie it to the band and their song.

Unfortunately, due to the scope of the project and my naivety, I was unable to complete the entire animation but I have a good portion of the song completed and I am happy with what I have. I made sure that the song came to a natural stopping point and I also re-cut it so that the last line of the song, which fades out, would end my animation so that it didn’t feel like an abrupt stop.

FMP 3: Problem Solving

I’ve mentioned in previous posts that there was a degree of compromise and problem solving needed to translate my storyboards into a functioning animation. There were several reasons for this: I’ve already mentioned that the puppets were very hindering with their limited mobility. My level of competence would have also played a part; this project was certainly the most ambitious that I have attempted. Even the stop-motion medium itself can be limiting, it is also part of the charm but nevertheless, it can be another barrier.

I’ve highlighted one clip to demonstrate how I translated my initial idea into the final product:

In this shot, I wanted a slow, consistent zoom out which would reveal more of the scene as it continued. Unfortunately, due to the scale I was working at, there was no feasible way to have a smooth zoom that lasted the entirety of the shot. I had two options, either zoom out very slowly, by eye, and risk the consistency of the motion, or I could do what I decided to do, and have the zoom be only a portion of the scene. Whilst I would have much preferred what I had storyboarded, I believe the compromise is still effective and I chose the correct time to begin the zoom.

The shot also demonstrates the inefficiency of the puppets; they are unable to grasp the sledgehammer with both hands as their arms are too short to wrap around their bodies. To get around this, I simply made them one handed hammers but made sure that the free arm was still contributing to the swing by being a counter-balance.

Sometimes I need to animate an entire shot before I realise that I need to go about it in another way. One of the final shots in my animation, for example, didn’t turn out the way I wanted so I had to re-shoot.

The main issue with the first version is a problem that I have whenever I do any camera movements in that it’s all manual and the movements can be inconsistent and “jerky”. With the second version, I paid painstaking attention to the minute adjustments I made. It took three times as long to animate the shot but I do believe it was worth it in the end.

FMP 3: Filming Process

There was a lot of compromising when it came to filming my animation; an over-ambitious storyboard pitted against a mix of the restraints of the medium and my own lack of experience. Once the actual animating began though, I feel it went relatively smoothly.

A selection of “behind the scenes” photographs illustrating the puppets on stage and the lighting and camera set up. I found this animation a little tricky to light well because everything is so dark and almost monochromatic. Fortunately the brief calls for a dark and atmospheric tone and whilst I would have liked a little more control over it, I believe I was able to light the animation correctly and it led to an atmospheric final piece.

FMP 3: The Props

To further the narrative of my music video I also had to create props for the puppets to interact with.

The aesthetic that I was aiming for was that of a well lived-in world where everything’s dirty and used and none of it is particularly well looked after. I feel that I was able to achieve that, giving everything a layer of dust after it was made to give the impression that it has been in use for decades.

The fiddliest of the props was the head torch, worn by one of the creatures, that I wanted to be functional.

I used an LED to emit the light and by concealing the wires within the headband and keeping the battery out of shot, I was able to successfully fabricate the item. Despite my very humble electrical skills, I enjoy working with them and this project gave me another (albeit small) opportunity to learn a little more about the subject.

FMP 3: The Set

To accommodate for shooting scenes I needed more space. I extended the set I had build as a display for my Self Initiated Project and turned it into a functioning set.IMG_0321IMG_0320IMG_0322
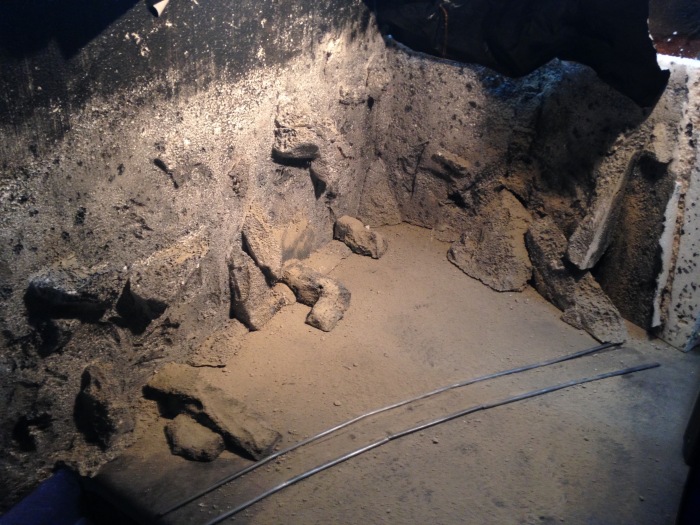
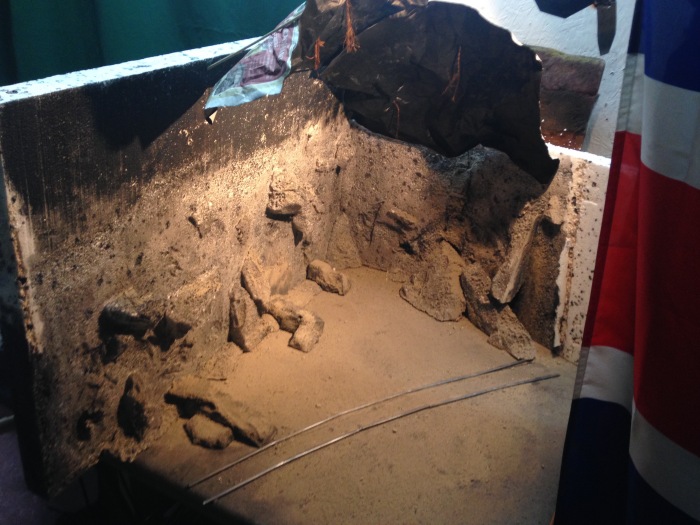
To make it as economical as possible, much of the detail is interchangeable so that I can recycle and reuse the same backdrop without it appearing so. The majority of the set is made from polystyrene which was painted to look like rock but for added detail, I used cement to give it a realistic, earthy dust which I really feel sells the idea of it being a cave.

FMP 3: The Puppets

IMG_0760There was a definite learning curve when constructing the puppets; they were by far the most complex that I had ever made but after only a few unsuccessful attempts, I came to a conclusion that I was happy with and was able to repeat.

This slideshow requires JavaScript.

What became an issue was when it came to animating the puppets. I was happy with the character design and overall I thought the puppets turned out fairly well but, unfortunately, they are far from functional. The puppets just don’t have the anatomy for what I wanted them to do – I was over-ambitious with my storyboard as it was and when it came to actually recreating those scenes, I realised I had set myself up for a difficult project; one that would require constant compromise.

I have now learnt, however, to consider the form and function of the design and to not base it purely on aesthetics. I am certain that this lesson will serve me well in my future as an animator.

FMP 3: Planning Process

My third ‘Final Major Project’ was a continuation of my ‘Self Initiated Project‘. As a result of this, a lot of the early production and manufacturing was already taken care of but there was still much to be done. To start, I touched up my storyboards and used them to create an animatic.

This slideshow requires JavaScript.

The animatics that I created for my previous two FMPs proved invaluable and, especially on a project this ambitious, I knew would be essential. I’d obviously considered the timing and structure of the video carefully when creating the storyboard but it’s not until the animatic stage that one really gets a sense of how the finished project will flow.

I’m happy with my animatic, there are a few moments in it where scenes look static or hold a little too long but I know from experience that they will be fleshed out in the animation stage. Not only does the animatic give a representation of what the finished product will look like, it also helps me when animating; I’m able to work out the length of shots and it’s a very useful tool during the editing process where I can use it as a direct reference.

FMP 1: Final Piece

My final piece:

This is the end result of my project and the animation that I would submit if the competition was still live. Overall I’m very happy with it; once again, the pre-production was invaluable and led to a much easier filming and editing process and the end result is as I’d envisioned.

There isn’t anything I’d particularly change about this project if I were to do it again but it didn’t go quite as proficiently as I had hoped. For some reason there was a stretch in the middle where I wasn’t being very productive, whilst it may have been partly down to the Easter holidays, I believe the majority of the blame falls down to the fact that I was a little stuck with where to go. As the brief was so open, I struggled a little with what direction to go and as I didn’t have that initial spark of inspiration (like I did with my FMP 2) I was left wondering. It was after I began working on the storyboards that the project picked up speed again and this is a tactic that I will certainly use in the future; getting tangible material in front of me really helped me visualise what I wanted to achieve and I was able to work from there.

Everyone who has seen the final animation has been favourable of it which gives me hopes for the chances it would have if it was submitted to the competition. I believe, if it is still applicable, that I will submit it in the next annual competition and it will be interesting to see how well I do.

FMP 1: Editing Process

In this screenshot you can see how all of the clips came together in the final edit.

Screen Shot 2016-04-27 at 16.05.34.png

As I was very precise with my animatic, and it was cut to exactly the time I wanted, I was able to use it as a guideline when editing my final animation and it made the process a lot easier. Also seen in the above picture are the diegetic sound effects that I recorded and added to the scene. The majority of these sound effects a relatively subtle as to not interfere with the supplied soundbed but there are couple of instances where I left them very audible, when the fish’s head is cut for example. I feel that my additions emphasise the actions within the animation and even add to the audio. Overall I’m very happy with how the animation came together at this stage.